May 28, 2013

Pizza Stuffed Peppers

Although my garden peppers are not ripe for the picking yet, I'm test driving some unconventional ways to use them. The following recipe was adapted from Hungry Girl
I ate these delicious pizza stuffed peppers for lunch today and found them to be very satisfying!


Ingredients:

2 Bell Peppers 
(any color will do)
 1 cup of mushrooms, sliced
1/2 cup of onion, chopped
1 cup of lean ground beef, *seasoned*
 (I used leftover seasoned ground beef that I had used to make hamburgers the night before)
3/4 cup of pizza sauce 
(I used store-bought)
 1/2 cup of low fat shredded cheese 
(I used 2% Mexican blend)


Method:

Preheat oven to 375 degrees. Coat a 9" x 13" baking dish with cooking spray.

Slice bell peppers in half lengthwise and remove seeds and stems.

Place bell peppers cut side up into the baking dish and bake for 20 minutes, or until slightly softened.

In the meantime, spray a skillet with nonstick cooking spray and satuee the onions and mushrooms on medium high heat until the onions are translucent. Set them aside when they're done.

Brown the seasoned ground beef in the same skillet. Drain the fat once the meat is browned.

Add pizza sauce to browned ground beef and combine.

When the peppers are done, remove them from the oven and blot them to remove moisture. Fill each pepper half with 1/4 of the beef & pizza sauce mixture, followed by 1/4 of the mushroom & onion mixture.

Sprinkle shredded cheese over all of the pepper halves and bake for 10 minutes or until cheese is melted.

You can enjoy 2 (TWO!) pizza stuffed pepper halves for a total of 7 points plus values!

Enjoy!

May 20, 2013

Mediterranean Cucumber Cups


I couldn't help but think about our little garden over the past week while we were away. We hadn't recruited anybody to water it so I wasn't quite sure how things would look upon our return. Much to our surprise, among the thirsty leaves, I spotted our first little harvest!

I wanted to put our veggies to good use right away so as not to let them go to waste. It appears that we'll have an ample supply of fresh cucumbers this summer, so I wanted to try something aside from the conventional cucumber and tomato salad. After a little Google research and a little inventory of my fridge contents, I decided on these beautiful little cucumber cups- Mediterranean style!


First up, I chose the right cucumber for the job and gave him a little wash. Then I chopped the ends off of the little fellow and used a vegetable peeler to trim his skin in a pretty little pattern. (There's really no other reason to trim the skin except to make it pretty, but I like a little aesthetic appeal to my food.)


Next up, I sliced him into about 1/2 inch pieces.

Then I used a melon baller to scoop out the seeds, creating a little cup in the center.

My little cucumber cups lined up all nice and pretty, waiting to be filled.

Time to fill them with all sorts of yummy goodness.

I filled 6 cucumber cups using:
6 teaspoons of roasted red pepper hummus (2 pp)
12 kalamata olive halves (1pp)
6 cherry tomato halves (0 pp)
.5 ounces of feta cheese (1 pp)

Each cup got 1 teaspoon of hummus, 2 kalamata halves, 1 cherry tomato half, and a small topping of feta cheese. Sprinkle them with a little salt to taste if you like.

I ate these for dinner one night this week, and it only cost me 4 Weight Watchers points Plus values for all 6 cups! 
I had a few Melba toasts on the side because I didn't have any pita chips, but next time I'll be more prepared.

Enjoy!

May 13, 2013

Drying, Chopping, & Storing Fresh Parsley

A few weeks ago I shared a very useful method for preserving parsley by freezing it in "logs". I've since used some of my frozen parsley, and I'm very happy with the turnout. The frozen parsley had a nice strong flavor that added a pleasant kick to my Crowd-Pleasing Italian Meat Sauce

I also wanted to try an alternative method for preserving herbs, which is drying them.

Drying herbs takes a significantly longer amount of time to get from start to finish if you're using the traditional air-drying method, which is what I used. (The other option would be to quick-dry the herbs in the oven. I haven't braved that territory yet.)

I used the 'ole "hang your parsley bunch by the string on the kitchen blinds" method.  They added a a touch of style to our kitchen for a couple of weeks.
The first step to preserving any herb is, of course, cleaning the herbs to rid them of any dirt or bugs that have taken up residence on the aromatic leaves. You can see how I clean my herbs here. After cleaning and blotting dry with a paper towel, parsley should be hung upside down. I gathered my stalks into a loose bundle and tied the ends with a plastic hair tie before hanging.
It's also important that the parsley hangs in a mostly humidity-free environment so that it doesn't get moldy.

It's takes about 2-3 weeks for the parsley to dry out completely. Properly dried parsley leaves will appear shriveled and crumbly to the touch. 

Once your parsley is dried, it's time to get to work. 

Use a pair of scissors to trim the leaves off of the stems. You could just as easily pull them off with your fingers.

Once the leaves are removed, place them into an air-tight jar, like a mason jar. You have two options here: (1) store the leaves whole and chop them right before cooking or (2) chop them now and save yourself a step later. The benefit of storing the leaves whole is that you will get more flavor our of the leaves by chopping them right before use.

I wanted to save myself a step later, so I chopped my parsley before storing. 

I've discovered that the fastest and easiest way to chop fresh or dried herbs is by putting a handful of them at a time into the bottom of a glass and using a pair of clean scissors to snip away the leaves until they are minced in appearance.

Once your leaves are all chopped, place them in an air-tight container and store them in a cool, dry place. Dried parsley will maintain it's flavor for over a year if stored properly. 
 
Happy Drying, 

 
April 23, 2013

Preserving Fresh Parsley

 I'm discovering quickly that fresh herbs can quickly overtake a garden.
 And being quite inexperienced in the fine art of gardening, I've had to do plenty of research to figure out a way to prevent my beloved parsley from going to waste. 
My options seemed to be either freezing of drying
I experimented with the former and have been very pleased with the results. 
Here's a very simple way to preserve fresh parsley.
1. Snip off several stalks of parsley with a pair of scissors, starting from the outside of the plant and working your way in. Cut the stalks close to the ground (about 2 inches).

2. Gather the fresh parsley by the stalks and swish it around in a bowl of clean water to remove all dirt. You may need to use your fingers to remove caked-on dirt from some of the leaves.

(My parsley was pretty dirty!)

3. Separate the stalks and lay them out as flat as possible onto paper towels to let them dry. I let my parsley stalks sit out overnight to make sure they were completely dry.
4. Once the parsley is dry, snip the leaves from the stems with a pair of scissors.

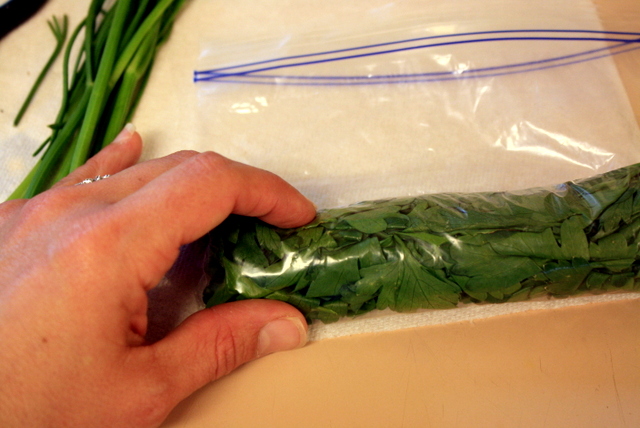
5. Place the parsley leaves into a small plastic baggie, tightly packing them to form a log shape at the bottom of the bag (see picture below).

6. Tightly roll the parsley "log" toward the top of the bag, releasing air as you go. The log should be firm. You'd be surprised how much parsley can fit into such a small space!

7. Seal the plastic baggie and secure it with rubber bands on both ends. Label it so that you can identify it when you're ready to use it. I plan to freeze my cilantro this way to, and I definitely don't want to mistake the two!
8. When you're ready to use the parsley, simply remove the frozen "log" from the baggie and slice it according to your need (see picture below). It doesn't take a big slice to yield an ample amount of parsley. The rest of the parsley can be put back into the baggie and then into the freezer for future use.

(It's very easy to cut into.)

9. Chop parsley to your liking and use it in a delicious recipe!
Enjoy!

 
February 14, 2013

Banana Cream Pie Milkshake


In honor of Valentine's Day I thought I'd share a little dessert that's big on flavor but small on calories. Let's face it, there aren't many of those around. And even fewer worth writing about. But I think you'll be happy with this little gem. This recipe for Banana Cream Pie Milkshake makes one serving, so double the ingredients if you're sharing it with your Valentine today!

Banana Cream Pie Milkshake

(adapted from Eat What You Love cookbook.)

INGREDIENTS:

2/3 cup low-fat milk
1 rounded tablespoon sugar-free instant banana cream pudding mix
1/3 cup light, no sugar added ice cream (Blue Bell makes a delicious version)
2/3 cup crushed ice
2 tablespoons light whipped topping (optional)
1 tablespoon crushed graham cracker crumbs (optional)

DIRECTIONS:


Place milk, instant pudding mix, and ice cream in a blender and blend until well-mixed. Add ice and continue to blend until the consistency is thick and creamy.

Pour into your glass of choice and top with whipped topping and graham crackers.

Enjoy!

Weight Watchers Points Pus (without whipped topping and graham crackers): 4
Weight Watchers Points Plus (with whipped topping and graham crackers): 5

Hope you all are having a Happy Valentine's Day!

 
January 24, 2013

Clean Eating White Bean and Vegetable Soup

I thought I'd share a recipe that I've made twice this week! It was a little experiment I called "kitchen sink" vegetable soup because I put everything but the kitchen sink in it! After making it the first time around my husband pronounced it the best soup he had ever eaten and requested that I make it again. The second time around I carefully measured ingredients so that I could turn in into an actual recipe. It was just as good the second time around.

Clean Eating White Bean and Vegetable Soup

1 cup carrots, peeled and sliced
1/2 cup onion, finely diced
4 tablespoons minced garlic
8 cups (2- 2 lb. cartons) vegetable broth
4 cups shredded cabbage
1 cup corn
2 (15.5 ounce) cans great northern beans, undrained
1 1/2 pounds potatoes, diced (washed and unpeeled)
1 (6 ounce) can tomato paste
2 teaspoons dried sweet basil
1 teaspoon dried oregano
1 teaspoon dried parsley
2 teaspoons salt (more to taste)

Spray a large stock pot with nonstick cooking spray. Saute the carrot, onion, and garlic over low heat until softened (about 5 minutes). Add all remaining ingredients and bring to a boil. Reduce heat and simmered, covered, for about 30 minutes or until potatoes are cooked through. Serve hot.

Makes 15 one cup servings at 3points plus values per serving.