November 11, 2013

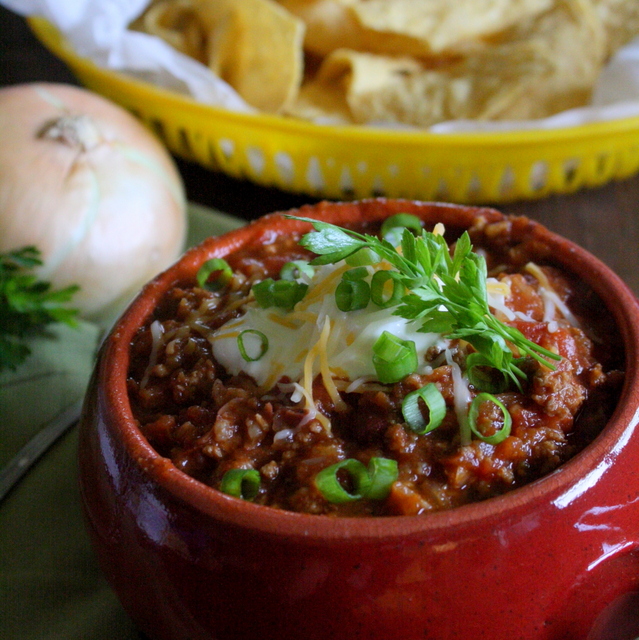
Light & Flavorful Weeknight Chili

One of my favorite fall meals is a warm, savory bowl of chili... usually topped sour cream, cheese, chives, and a few crumbled chips... sometimes ladled over a roasted hot dog. My mom's homemade chili was a staple in the home I grew up in, and I still find it very comforting to this day. After starting Weight Watchers, I searched the internet for a similar but lighter version of the chili I grew up eating, and I finally found one that I'm the whole family is happy with--even my picky eater. This meal family-friendly, quick, and easy. I hope you and your family enjoy it as much as we do.

Weight Watchers Chili (5 points plus per heaping cup)

Light and Flavorful Weeknight Chili

adapted slightly from weightwatchers.com

Ingredients:
1 lb. 93% lean ground beef
1 medium onion, diced
2 ribs of celery, diced
2 cloves of garlic, minced
1 small jalapeno pepper, seeded and minced
2 Tablespoons chili powder
2 teaspoons ground cumin
1 teaspoon dried oregano
2 bay leaves
2 teaspoons of salt
 2 Tablespoons of brown sugar
28 ounce can of crushed tomatoes
2 cups of beef broth
8 ounce can of tomato sauce
15 ounce can of kindey beans, drained and rinsed
Cooking Spray

Instructions:

Lightly coat a stock pot with cooking spray. Place ground beef, onion, celery, garlic, and jalapeno into a large stock pot and cook over medium heat until beef is browned. Add chili powder, cumin, oregano, bay leaves, salt, and sugar. Stir to coat beef and vegetables with spices. Add tomatoes, broth, tomato sauce, and kidney beans to the pot; bring to a boil. Reduce heat to low and simmer, partially covered, for 30 minutes. Remove bay leaves before serving. Top with toppings of your choice (sour cream, cheese, chives, etc).

Makes approximately 7 heaping cups of chili at 5 Weight Watcher Points Plus per serving (1 heaping cup, not including toppings).

Enjoy!
August 15, 2013

6 {Weight Watcher Friendly} Hotel Room Snacks

Happy Monday, everyone! Normally I would be sitting at home creating my menu plan and shopping list for the week, but this week I'm enjoying a little R & R at the beach with my family! Silas remembers his last visit to the beach, but little Liam was only 4 months last time we hit the sands of the gulf shores. Needless to say, he is soaking it all in and loving every minute!

 
So, of course, no cooking for me this week! Instead, we're enjoying hot lukewarm hotel breakfasts, quick sandwiches for lunch, and fun dinners out. But just like at home, we need a few fillers in between to keep our tummies happy. We have two little guys, so we have our fair share of fruit snacks and pudding cups lying around, but we've also got a stash of healthy snacks to keep us full without breaking the calorie bank. Here's what you'd find if our hotel pantry chest of drawers if you stopped by...


{1} Family Favorite :: Smartfood Popcorn (White Cheddar)

{2} Salty Fix :: Dry Roasted Edamame
  
{3} Fast & Fresh :: Assorted Fruit

{4} Hold Me Over :: Assorted Granola Bars

{5} Chocolate Fix :: Fiber One Brownies

{6} Mama's Must-Have :: Complimentary Coffee from the Hotel Lobby

Happy Snacking!

August 8, 2013

General Tso's Chicken

If I'm not munching on Mexican food it's likely that you'll find me savoring a delicious Asian dish. Last week I tried a new Weight Watchers recipe for one of my favorite Asian dishes--General Tso's Chicken. I had my doubts about how this recipe would turn out, but I was pleasantly surprised with the outcome. It was super simple to prepare and the whole family loved it (well, except for my picky eater, of course). Sometimes when I try a new recipe, even though it turns out delicious, if it was too time-consuming or if it required hard-to-find ingredients, I don't put it on our regular dinner rotation. Neither was the case with this recipe. It was just my style--quick and easy-- and I will gladly add it to our regular dinner rotation!


General Tso's Chicken
 (adapted from weightwatchers.com)

Ingredients:

3/4 cup of chicken broth
1 1/2 tablespoons cornstarch
2 tablespoons sugar
2 tablespoons soy sauce
1 tablespoon white wine vinegar
1/2 teaspoon ground ginger
2 teaspoon olive oil
2 medium scallions, chopped
2 cloves garlic, minced
1/2 teaspoon red pepper flakes
1 pound uncooked boneless skinless chicken breasts, cut into 2-inch pieces
2 cups cooked white rice

Instructions:

In a bowl, whisk together broth, cornstarch, sugar, soy sauce, vinegar and ginger. 

Heat olive oil in a large skillet over medium-high heat. Add scallions, garlic and red pepper flakes. Cook for about 2 minutes, stirring frequently.

Add chicken to skillet. Cook until chicken pieces are begin to brown, about 5 minutes.

Add sauce to the skillet and simmer until sauce thickens and chicken is cooked through.

Serve chicken and sauce over rice.

This recipe makes 4 serving. Enjoy about 1 cup of chicken with sauce and 1/2 cup of rice for 8 Weight Watchers points plus values. 

August 1, 2013

Fresh Squeezed Lemonade with NuStevia™

Nothing says summer like a tall glass of fresh, homemade lemonade. If you haven't made any yet this summer, now is the time to get on that! I haven't always been a fan of lemonade, but soon after I got married I discovered that my husband makes the perfect homemade lemonade. I was hooked.


We haven't always been so calorie conscious when it comes to our beverages, so for years we stirred cups of sugar into our homemade lemonade. I was hesitant to make the switch to a zero-calorie sweetener because I really don't like the taste of artificial sweeteners. Soon after I started Weight Watchers my Mom introduced me to a new zero-calorie sweetener that she had discovered at Whole Foods called NuStevia™, an all natural herbal sweetener. She told me it was the perfect addition to a glass of lemon water. She bought me a box, and I discovered that lemons and NuStevia™ are indeed a match made in heaven. We've since substituted NuStevia™ for sugar in our lemonade recipe. We also use it in our coffee, smoothies, oatmeal, and grapefruit-ade! Unlike other Stevia products, it's non-bitter and doesn't leave an unpleasant aftertaste in your mouth. We love it!

Now for the recipe...

Fresh Squeezed Lemonade with NuStevia™


Ingredients

4 Medium Lemons (about 3/4 cup of juice)
12 packets of NuStevia™
6 Cups cold water

Instructions

Juice the lemons. I use a simple manual juicer. Combine the lemon juice, NuStevia™, and water in a pitcher and stir. Serve over crushed ice or add 1-2 cups of crushed ice to the pitcher before serving.  

Optional: place a few lemon slices in the pitcher for a beautiful garnish and added lemon flavor.

Divided between 6 tall glasses, this lemonade is zero Weight Watcher points plus per glass.


iHerb.com is the cheapest place I've been able to get NuStevia™. It is also a wonderful place to pick up other quality herbal supplements and all natural products. They offer free 1-3 day shipping on all orders over $40, and, if you're a first time customer you can use the code NUJ843 and get $10 off your first order!! Browse through the health links page while you're there. There's a lot to learn! And don't forget to add some NuStevia™ to your cart so you can make some tasty, fresh-squeezed lemonade! You won't be disappointed!


P.S. Before starting any herbal supplements, it's always important to check with your physician!

July 25, 2013

Butternut Squash Fries


Meet my little friend, Mr. Butternut. He's been helping me to overcome my french fry addiction by offering me a healthy alternative. I highly recommend his services.


I LOVE french fries. As in, I could skip the burger and just eat the fries. They are the ultimate comfort food, but unfortunately, the ultimate fatty food. When I started Weight Watchers back in 2012, I came across Hungry Girl's french fry alternative, and gave it a test drive. To me they fall somewhere in between the french fry and the sweet potato fry, but unlike french fries and sweet potato fries, these butternut babies are ZERO Weight Watcher points plus values! Score! Almost a year later, and I'm still relying on this simple recipe to curb the fry craving.

You start out by slicing the ends off of your butternut squash and peeling it with a vegetable peeler.
Oh yeah, and now would be a good time to preheat your oven to 425 degrees.


Next you slice it in half lengthwise and scoop out the seeds from the round bottom half. 

From there you can cut it up into French fry shapes/spears however you please. I usually cut each half right when the neck meets the round bottom and go from there.


Once your squash is cut into french fry shapes, lay the fries out on a paper towel and sprinkle them lightly with salt. This part is pretty cool. The salt will slowly pull the moisture out of the squash fries, and they'll start to look like they're sweating. I leave mine for about 5-10 minutes. Once they're worked up a good sweat, blot them dry with another paper towel to remove the moisture.
Skipping this important step will lead to soggy fries, so no shortcuts!


Now it's time to bake them! To bake mine, I take a wire cooling rack, spray it with non-stick cooking spray, and lay it inside a cookie sheet. This helps the fries to breath better and to cook more evenly, which leads to crispier fries. If you don't have a cooling rack, just spray the cookie sheet with non-stick cooking spray and lay them directly on the cookie sheet. No bigs.


Bake the fries for 40 minutes, flipping halfway through. Fries are done when they start to brown on the edges and get crispy.

Serve them with your condiment of choice and enjoy!


{shared with Homegrown & Healthy's Mostly Homemade Mondays}

July 18, 2013

Lemony Low Calorie Hummus with Garlic & Cumin

It's no secret that I'm a chips and dip kinda girl. When the smoothness of a dip meets the crunchiness of a chip, my mouth just can't resist. Consequently, it's very easy for me to overindulge when chips and dips are at my fingertips, so I've refrained from buying them for quite some time. Last week, I welcomed guacamole back into the fridge, and this week I'm welcoming hummus! Normally, I buy Sabra hummus, but it's 2 Weight Watcher points plus values for only 2 tablespoons, which isn't worth it to me. The recipe I'm about to share with you is only 1 Weight Watcher points plus value for 1/4 cup! Can we say, "score"?! And I think you'll be very happy with the flavors. I over-salted my first batch, so be careful with the salt. Other than that, I thought the flavor combination was delicious for this low calorie treat.

In case you're unfamiliar with the main ingredient in hummus, let me introduce you to the garbanzo bean. (When the word "garbanzo" comes out of my mouth, it triggers visions of Gonzo from the Muppet Babies in my head. But I digress. Now back to the bean.)


Garbanzo beans are also called chickpeas. Like other beans and lentils, they are very high in fiber and also a great source of protein and iron. And they're cheap, so you get lots of bang for you buck. I used canned garbanzo beans for this recipe, but you could also buy the dried variety (which would increase your preparation time greatly because you would need to soak and cook them first). In my opinion, canned works just fine!

And now for the recipe...


Lemony Low Calorie Hummus with Garlic & Cumin

(adapted from Not Done Yet blog)

Ingredients

2 cans of garbanzo beans, rinsed and drained (about 2 cups of cooked beans if using the dried variety)
3-5 cloves of garlic, depending on your taste for garlic (I used 5)
Juice of 1 lemon
2 teaspoons ground cumin
2 teaspoons soy sauce
1/2 cup chicken broth (or vegetable broth if you prefer)
1/2 teaspoon salt

Instructions

Put all ingredients into a food processor and blend until all ingredients are fully integrated and the hummus is a smooth, thick texture. I started by pulsing the mixture several times, scraping the sides and stirring the mixture every few pulses. After pulsing for a while, I let the food processor run for about 1-2 minutes to get the mixture nice and smooth. Pour prepared hummus into a bowl and serve with pita chips, pretzel sticks, or your favorite veggies. Enjoy!

This recipe makes approximately 3 cups of hummus or 12 {1/4-cup} servings. Each serving is 1 Weight Watcher points plus value.

July 1, 2013

Creamy Cilantro Lime Dressing

Quick & Healthy Taco Salad with Creamy Cilantro Lime Dressing {Recipe Below}

A couple of week ago, I had a delicious taco salad for lunch. I tried a new recipe for a Creamy Cilantro Lime Salad Dressing to pour over the taco salad. I'm a cilantro-lover so I thought it was the perfect touch to the salad. It's low-calorie, and only 1 Weight Watcher point plus for 1/4 of the recipe, which equals to a little under 1/4 cup per serving.


Creamy Cilantro Lime Dressing


 Ingredients:

1/3 cup light sour cream (not fat free!)
1/3 cup low fat plain yogurt (Fage 2% would be a good choice!)
1/2 cup chopped cilantro (curious how I chop my herbs?), loosely packed
2 tablespoons lime juice (about 1 lime)
1/4 teaspoon garlic salt

Instructions:

Combine all ingredients in a blender and combine until smooth! Best served over taco salad.  Enjoy!


May 28, 2013

Pizza Stuffed Peppers

Although my garden peppers are not ripe for the picking yet, I'm test driving some unconventional ways to use them. The following recipe was adapted from Hungry Girl
I ate these delicious pizza stuffed peppers for lunch today and found them to be very satisfying!


Ingredients:

2 Bell Peppers 
(any color will do)
 1 cup of mushrooms, sliced
1/2 cup of onion, chopped
1 cup of lean ground beef, *seasoned*
 (I used leftover seasoned ground beef that I had used to make hamburgers the night before)
3/4 cup of pizza sauce 
(I used store-bought)
 1/2 cup of low fat shredded cheese 
(I used 2% Mexican blend)


Method:

Preheat oven to 375 degrees. Coat a 9" x 13" baking dish with cooking spray.

Slice bell peppers in half lengthwise and remove seeds and stems.

Place bell peppers cut side up into the baking dish and bake for 20 minutes, or until slightly softened.

In the meantime, spray a skillet with nonstick cooking spray and satuee the onions and mushrooms on medium high heat until the onions are translucent. Set them aside when they're done.

Brown the seasoned ground beef in the same skillet. Drain the fat once the meat is browned.

Add pizza sauce to browned ground beef and combine.

When the peppers are done, remove them from the oven and blot them to remove moisture. Fill each pepper half with 1/4 of the beef & pizza sauce mixture, followed by 1/4 of the mushroom & onion mixture.

Sprinkle shredded cheese over all of the pepper halves and bake for 10 minutes or until cheese is melted.

You can enjoy 2 (TWO!) pizza stuffed pepper halves for a total of 7 points plus values!

Enjoy!

May 20, 2013

Mediterranean Cucumber Cups


I couldn't help but think about our little garden over the past week while we were away. We hadn't recruited anybody to water it so I wasn't quite sure how things would look upon our return. Much to our surprise, among the thirsty leaves, I spotted our first little harvest!

I wanted to put our veggies to good use right away so as not to let them go to waste. It appears that we'll have an ample supply of fresh cucumbers this summer, so I wanted to try something aside from the conventional cucumber and tomato salad. After a little Google research and a little inventory of my fridge contents, I decided on these beautiful little cucumber cups- Mediterranean style!


First up, I chose the right cucumber for the job and gave him a little wash. Then I chopped the ends off of the little fellow and used a vegetable peeler to trim his skin in a pretty little pattern. (There's really no other reason to trim the skin except to make it pretty, but I like a little aesthetic appeal to my food.)


Next up, I sliced him into about 1/2 inch pieces.

Then I used a melon baller to scoop out the seeds, creating a little cup in the center.

My little cucumber cups lined up all nice and pretty, waiting to be filled.

Time to fill them with all sorts of yummy goodness.

I filled 6 cucumber cups using:
6 teaspoons of roasted red pepper hummus (2 pp)
12 kalamata olive halves (1pp)
6 cherry tomato halves (0 pp)
.5 ounces of feta cheese (1 pp)

Each cup got 1 teaspoon of hummus, 2 kalamata halves, 1 cherry tomato half, and a small topping of feta cheese. Sprinkle them with a little salt to taste if you like.

I ate these for dinner one night this week, and it only cost me 4 Weight Watchers points Plus values for all 6 cups! 
I had a few Melba toasts on the side because I didn't have any pita chips, but next time I'll be more prepared.

Enjoy!

May 13, 2013

Drying, Chopping, & Storing Fresh Parsley

A few weeks ago I shared a very useful method for preserving parsley by freezing it in "logs". I've since used some of my frozen parsley, and I'm very happy with the turnout. The frozen parsley had a nice strong flavor that added a pleasant kick to my Crowd-Pleasing Italian Meat Sauce

I also wanted to try an alternative method for preserving herbs, which is drying them.

Drying herbs takes a significantly longer amount of time to get from start to finish if you're using the traditional air-drying method, which is what I used. (The other option would be to quick-dry the herbs in the oven. I haven't braved that territory yet.)

I used the 'ole "hang your parsley bunch by the string on the kitchen blinds" method.  They added a a touch of style to our kitchen for a couple of weeks.
The first step to preserving any herb is, of course, cleaning the herbs to rid them of any dirt or bugs that have taken up residence on the aromatic leaves. You can see how I clean my herbs here. After cleaning and blotting dry with a paper towel, parsley should be hung upside down. I gathered my stalks into a loose bundle and tied the ends with a plastic hair tie before hanging.
It's also important that the parsley hangs in a mostly humidity-free environment so that it doesn't get moldy.

It's takes about 2-3 weeks for the parsley to dry out completely. Properly dried parsley leaves will appear shriveled and crumbly to the touch. 

Once your parsley is dried, it's time to get to work. 

Use a pair of scissors to trim the leaves off of the stems. You could just as easily pull them off with your fingers.

Once the leaves are removed, place them into an air-tight jar, like a mason jar. You have two options here: (1) store the leaves whole and chop them right before cooking or (2) chop them now and save yourself a step later. The benefit of storing the leaves whole is that you will get more flavor our of the leaves by chopping them right before use.

I wanted to save myself a step later, so I chopped my parsley before storing. 

I've discovered that the fastest and easiest way to chop fresh or dried herbs is by putting a handful of them at a time into the bottom of a glass and using a pair of clean scissors to snip away the leaves until they are minced in appearance.

Once your leaves are all chopped, place them in an air-tight container and store them in a cool, dry place. Dried parsley will maintain it's flavor for over a year if stored properly. 
 
Happy Drying, 

 
April 23, 2013

Preserving Fresh Parsley

 I'm discovering quickly that fresh herbs can quickly overtake a garden.
 And being quite inexperienced in the fine art of gardening, I've had to do plenty of research to figure out a way to prevent my beloved parsley from going to waste. 
My options seemed to be either freezing of drying
I experimented with the former and have been very pleased with the results. 
Here's a very simple way to preserve fresh parsley.
1. Snip off several stalks of parsley with a pair of scissors, starting from the outside of the plant and working your way in. Cut the stalks close to the ground (about 2 inches).

2. Gather the fresh parsley by the stalks and swish it around in a bowl of clean water to remove all dirt. You may need to use your fingers to remove caked-on dirt from some of the leaves.

(My parsley was pretty dirty!)

3. Separate the stalks and lay them out as flat as possible onto paper towels to let them dry. I let my parsley stalks sit out overnight to make sure they were completely dry.
4. Once the parsley is dry, snip the leaves from the stems with a pair of scissors.

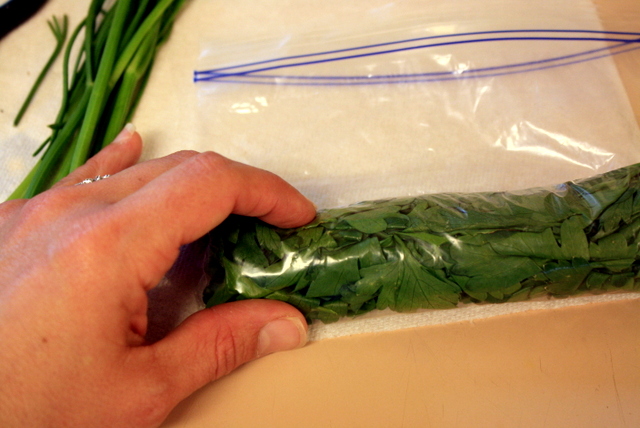
5. Place the parsley leaves into a small plastic baggie, tightly packing them to form a log shape at the bottom of the bag (see picture below).

6. Tightly roll the parsley "log" toward the top of the bag, releasing air as you go. The log should be firm. You'd be surprised how much parsley can fit into such a small space!

7. Seal the plastic baggie and secure it with rubber bands on both ends. Label it so that you can identify it when you're ready to use it. I plan to freeze my cilantro this way to, and I definitely don't want to mistake the two!
8. When you're ready to use the parsley, simply remove the frozen "log" from the baggie and slice it according to your need (see picture below). It doesn't take a big slice to yield an ample amount of parsley. The rest of the parsley can be put back into the baggie and then into the freezer for future use.

(It's very easy to cut into.)

9. Chop parsley to your liking and use it in a delicious recipe!
Enjoy!